
News


Pizza Oven Disasters: When Your Homemade Pizza Doesn't Go as Planned (And How to Fix It!)
So, you’ve finally got your hands on a brand-new pizza oven, ready to impress your friends and family with delicious, homemade pizzas. But instead of a picture-perfect pie, you ended up with a kitchen catastrophe. Sound familiar? Don’t worry – you’re not alone!
From sticky dough nightmares to burnt crusts, we’ve all had our share of pizza-making disasters. Here’s a look at some common pizza pitfalls and how to turn those flops into fabulous, mouth-watering success.
1. Dough Making Gone Wrong One of the most common challenges is getting the dough just right. Too dry, and it cracks; too wet, and it’s unmanageable. If your dough isn’t cooperating, don’t give up!
Tip:
- Always measure your ingredients precisely and use a kitchen scale if possible.
- If your dough is too sticky, sprinkle a bit of flour over it, but be careful not to add too much, or your dough will become tough.
- Allow your dough to rest and rise properly – this step is crucial for achieving that perfect, airy texture.
2. Pre-Made Dough Sticking to Everything So, you thought you’d save time with pre-made dough, but instead, you’ve created a sticky mess. It’s like trying to peel sticky tape from cling film – not exactly the pizza-making experience you had in mind.
Tip:
- Dust your work surface and pizza peel generously with flour or cornmeal before laying down the dough. This helps prevent sticking and makes transferring the pizza into the oven a breeze.
- If you’re using a pizza peel, give it a gentle shake before topping your pizza to ensure it’s not sticking.
3. Pizza Oven Not Hot Enough You’ve assembled your pizza, slid it into the oven, and waited eagerly, only to find the crust is pale and doughy. The culprit? A pizza oven that wasn’t hot enough.
Tip:
- Preheat your pizza oven for at least 30-45 minutes before cooking to ensure it reaches the optimal temperature (around 450-500°C for wood-fired ovens).
- Invest in an infrared thermometer to check the oven’s surface temperature before cooking.
4. Pizza Burned to a Crisp On the flip side, there’s nothing worse than pulling out what was supposed to be a golden-brown masterpiece, only to find it charred beyond recognition.
Tip:
- Keep a close eye on your pizza while it’s cooking, especially if your oven is super hot.
- Rotate the pizza regularly to ensure even cooking, and consider lowering the temperature slightly if you’re finding that your pizzas are burning too quickly.
Conclusion: Making the perfect pizza takes a bit of practice, and even the best chefs have their off days. But with these tips in mind, you can turn your pizza disasters into pizza perfection in no time. So, don’t be discouraged by a few flops – keep experimenting, and soon enough, you’ll be serving up slices that are the envy of all your friends. Happy pizza making!
- Neil Finnerty
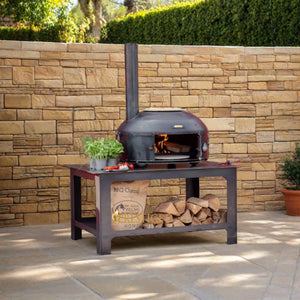

Ultimate Guide to Cooking Pizza in a Wood-Burning Pizza Oven
Cooking pizza in a wood-burning oven is an art that combines the right techniques and the best ingredients to produce a perfect pizza with a crispy crust, melted cheese, and a smoky flavour. Here’s a step-by-step guide to help you master the art of making pizza in your wood-burning oven, complete with hints and tips for best practices.Step 1: Preparing the Dough
Ingredients:
- 500g (3 1/2 cups) strong white bread flour
- 325ml (1 1/3 cups) warm water
- 1 tsp salt
- 1 tsp sugar
- 7g (1/4 oz) dry yeast
- 2 tbsp olive oil
- Activate Yeast: In a small bowl, mix warm water with sugar and dry yeast. Let it sit for 5-10 minutes until frothy.
- Mix Ingredients: In a large bowl, combine the flour and salt. Make a well in the centre and pour in the yeast mixture and olive oil.
- Knead the Dough: Mix until a dough forms. Turn it out onto a floured surface and knead for 10 minutes until smooth and elastic.
- Proof the Dough: Place the dough in an oiled bowl, cover with a damp cloth, and let it rise for 1-2 hours, or until doubled in size.
- Divide and Rest: Punch down the dough and divide it into 2-4 equal parts. Shape each part into a ball, cover, and let rest for 30 minutes.
Step 2: Preparing the Oven
- Preheat the Oven: Start by building a fire in the centre of your oven using dry, seasoned hardwood like oak, ash, or beech. Avoid using softwoods as they can impart a bitter taste.
- Heat Distribution: Let the fire burn for about 1-2 hours to heat the oven thoroughly. The temperature should reach between 700°F (370°C) to 900°F (480°C) for the perfect pizza.
- Check Temperature: Use an infrared thermometer to check the temperature of the oven floor and the dome. The floor should be around 650°F (343°C) and the dome around 800°F (426°C).
- Move the Fire: Once the oven reaches the desired temperature, push the fire and coals to one side or the back of the oven to create an even cooking area.
Step 3: Preparing the Toppings
- Tomato Sauce: Use high-quality canned San Marzano tomatoes. Crush them by hand or blend them lightly with a pinch of salt and a drizzle of olive oil.
- Cheese: Use fresh mozzarella for the best results. Tear it into small pieces to ensure even melting.
- Toppings: Keep it simple. Classic Margherita includes fresh basil leaves and a drizzle of olive oil. For other varieties, pre-cook ingredients like sausage or mushrooms to avoid excess moisture.
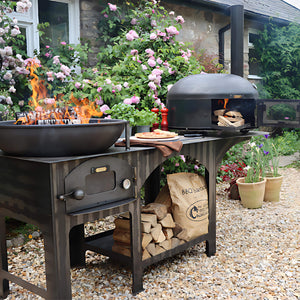
Step 4: Assembling and Cooking the Pizza
- Stretch the Dough: On a floured surface, gently stretch the dough into a round shape using your hands. Avoid using a rolling pin to maintain the dough’s airy structure.
- Transfer to Peel: Place the stretched dough onto a well-floured pizza peel. Give it a little shake to ensure it moves freely.
- Add Toppings: Spread a thin layer of tomato sauce, add cheese, and your desired toppings.
- Launch the Pizza: Slide the pizza off the peel and into the oven in one swift motion.
- Cook the Pizza: Cook for about 1-2 minutes. Use a pizza turner to rotate the pizza halfway through cooking to ensure an even bake.
Step 5: Finishing Touches
- Check for Doneness: The crust should be blistered and charred in spots, the cheese melted and bubbly, and the bottom crispy.
- Remove from Oven: Use the peel to remove the pizza from the oven.
- Add Fresh Toppings: Add fresh basil leaves, a sprinkle of grated Parmesan, or a drizzle of extra virgin olive oil.
- Slice and Serve: Let the pizza rest for a minute before slicing to allow the cheese to set slightly.
Hints and Tips for Best Practices
- Wood Selection: Use only dry, seasoned hardwoods to avoid excessive smoke and soot.
- Oven Maintenance: Regularly clean ash and debris from your oven to maintain efficient heating.
- Experiment: Try different dough recipes, wood types, and topping combinations to find your perfect pizza.
- Practice: Perfecting wood-fired pizza takes practice. Don’t get discouraged by initial failures.
- Hydration: Keep a spray bottle of water handy to manage the fire and adjust humidity as needed.
With these steps, hints, and tips, you’ll be on your way to making delicious, restaurant-quality pizzas in your wood-burning oven. Enjoy the process, and happy cooking!
Looking for a new Pizza Oven? explore our extensive selection of top-quality options. We offer a variety of models to suit different budgets, from portable to static, and from wood-burning to gas-powered. Browse our collection now and enjoy free delivery within 2 working days across the UK. Don't miss out on bringing the joy of homemade pizza to your home with our premium pizza ovens.
- Neil Finnerty

How to Maintain Your Outdoor Steel Heating and Cooking Products
Keeping your outdoor steel cookware and heating products in good condition not only extends their lifespan but also enhances their performance. Whether you’re a seasoned grill master or a novice outdoor cook, proper maintenance of your equipment is essential.
Here’s a comprehensive guide on how to maintain your steel cookware, from seasoning to storage, ensuring they remain in prime condition for your next outdoor cooking adventure.
Seasoning Your Cookware Before Use
Seasoning is a crucial step to prepare your steel cookware for use. It helps create a non-stick surface and prevents rust. Here’s how to do it:
- Heat Your Cookware: Start by heating your steel item to a medium-hot temperature. This can be done over a fire pit or in your oven.
- Clean Thoroughly: Wash the item in warm soapy water to remove any protective coating or residues. This is important as it prepares the surface for oiling.
- Dry and Oil: After cleaning, dry your cookware thoroughly. Once dry, apply a small amount of cooking oil evenly over the surface. Any standard cooking oil, such as vegetable, canola, or sunflower oil, works well.
- Heat Again: Heat the item to a hotter temperature than the first round. During this process, it’s normal to see some smoke.
- Repeat the Process: If required apply more oil and reheat a few times until the cookware develops a dark, even coating.
Care After Each Use
Proper after-use care is essential to keep your cookware ready for the next use:
- Clean and Dry: Always wash your cookware after use and dry it thoroughly. Using heat to dry off any excess moisture ensures that no water is left to cause rust.
- Oil the Surface: Before storing, lightly coat the cookware with cooking oil to protect the seasoned surface.
- Address Rust Promptly: If rust appears, use a wire brush to scrub it off and repeat the seasoning process to restore the protective layer.
Long-Term Maintenance Tips
To keep your outdoor steel products in top condition, consider these additional tips:
- Regular Oiling: Use 3-in-1 oil to maintain the hinges of your oven doors. This prevents them from seizing up and rusting.
- Winter Storage: If possible, store components like oven doors indoors during the winter to protect them from harsh weather or ensure fully covered with a good quality rain cover.
Preventing Rust with Oils and Paints
Besides regular cooking oils, you can use specific products to prevent rust:
- Heatproof Stove Paint: A coat of heatproof stove paint provides an excellent barrier against moisture and rust. This is particularly useful for parts of your setup that are exposed to high temperatures and cannot be regularly oiled.
- Mineral Oil: For parts not exposed to heat, mineral oil can be a great option as it doesn’t harden or gum up.
By following these maintenance tips, you ensure that your outdoor steel cooking and heating products stay clean, functional, and beautiful. Whether you’re roasting marshmallows or cooking a gourmet meal, well-maintained equipment will always enhance the experience.
- Neil Finnerty
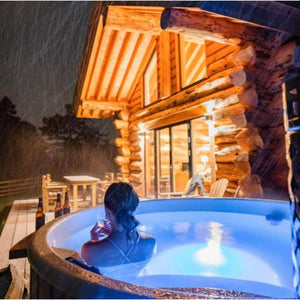

Frequently Asked Questions About Wood Burning Hot Tub Care and Maintenance
Step into tranquillity with wood-burning hot tubs, timeless sanctuaries offering relaxation and rejuvenation. Discover their therapeutic benefits for body and mind, from soothing sore muscles to reducing stress. Explore care tips and unlock the transformative power of soaking in nature's embrace.
Here is a list of frequently Asked Questions About Wood Burning Hot Tub Care and Maintenance
1. How do I clean my wood burning hot tub?
Cleaning your wood burning hot tub is essential for maintaining water quality and hygiene. Use a non-abrasive sponge or cloth along with a mild cleaner to wipe down the interior surfaces of the tub. Rinse thoroughly with clean water afterward.
- Make sure the stove has cooled down before draining the tub! Failure to do this could damage your stove.
- Drain the water out, and scrub all of the internal surfaces using a non abrasive sponge, cloth or brush and soap solution. Once complete, rinse down and refill.
- For hot tubs with liners, surfaces can be thoroughly wiped down in a similar fashion, before rinsing and refilling.
2. What should I do to prevent algae growth in my wood fired hot tub?
Algae growth can be prevented by regularly maintaining proper water chemistry. Ensure that the water pH level is within the recommended range (typically 7.2 to 7.8). Also, avoid leaving the tub uncovered for extended periods, especially in direct sunlight, as this can promote algae growth.
If the hot tub has a liner (fibreglass or polypropylene) you may use chlorine if you wish to keep using the same water for longer.
3. How often should I change the water in my wood fired hot tub?
It's tricky to give a straightforward answer because it varies! For wooden tubs, avoid using chemicals, so it's best to change the water every 2-3 days when using it often. Keep the lid on when not in use to prevent debris from getting in.
If you have a lined tub like fiberglass or polypropylene, you can use chlorine, natural equivalents or filtration systems to keep the water clean for longer, even weeks.
In places like glamping sites or vacation rentals, it's a good idea to change the water for each new guest.
In general it's recommended to change the water in your wood burning hot tub every 2 to 3 days for untreated and 2 to 4 weeks for treated depending on usage frequency and water quality.
Regularly changing the water helps maintain hygiene and prevents the build up of impurities.
4. Can I use chlorine or other chemicals to sanitize my wood burning hot tub?
Since wood-burning hot tubs typically don't have a filtration system, it's best to avoid using chlorine or other harsh chemicals. Instead, opt for natural sanitisers such as bromine or mineral-based solutions specifically designed for wood-fired hot tubs.
If the hot tub has a liner (fibreglass or polypropylene) you may use chlorine if you wish to keep using the same water for longer.
So, Chemicals can be used with lined tubs (fibreglass or polypropylene) where the water doesn’t come into contact with the timber facade but they are not required.
Using chemicals will simply allow the same water to be retained for longer, between cleaning.
5. How do I maintain the water temperature in my wood burning hot tub?
The water temperature in your wood fired hot tub can be maintained by adding more firewood to the stove or adjusting the air intake to regulate the heat. It's essential to monitor the temperature regularly using a thermometer and adjust accordingly to ensure a comfortable soaking experience.
6. What type of wood should I use for my wood fired hot tub?
Hardwoods such as oak, cedar, or maple are ideal for wood burning hot tubs due to their slow-burning properties and resistance to rot. Avoid using softwoods like pine or spruce, as they tend to burn quickly and can release resin into the water, causing potential maintenance issues.
7. How can I prevent rusting of the metal components in my wood burning hot tub?
To prevent rusting, regularly inspect metal components such as the stove, bands, and fittings for any signs of corrosion. Keep these parts dry when not in use and apply a rust-resistant coating if necessary. Additionally, ensure proper ventilation to reduce moisture buildup, which can accelerate rusting.
8. What should I do if I notice a strong odor coming from my wood fired hot tub?
A strong odor could indicate bacterial growth or an imbalance in water chemistry. First, check the water pH and sanitizer levels and adjust as needed. If the odor persists, consider draining and thoroughly cleaning the tub, including the interior surfaces and any accessories, to eliminate bacteria and impurities.
Take a look at our range of high-quality Wood Burning Hot Tubs here.
- Neil Finnerty